Finding Objects with StarDist Models
Note: Segmentation using Deep Learning requires the Deep Learning extension to the 2D Automated Analysis module. The Image-Pro Neural Engine must be installed. Installing the Image-Pro Neural Engine
Image-Pro supports object segmentation using Stardist Models. Stardist models perform instance segmentation (they attempt to identify each example or 'instance' of your objects of interest). Stardist is a convolutional neural network developed by Uwe Schmidt and colleagues (Schmit et al.2018) which predicts for every pixel a polygon for the object instance at that position. Startdist was designed to detect typically roundish objects such as cells and nuclei. Stardist copes well when objects are crowded and even copes with a degree of overlap between objects.
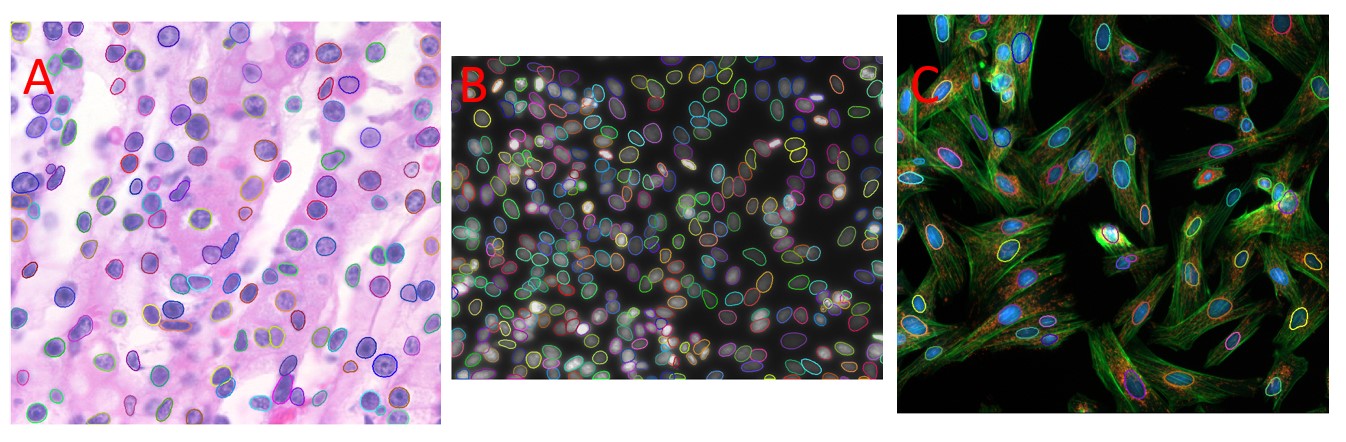
Figure showing examples of cellular nuclei detected using Stardist models. Nuclei were segmented with the Hematoxylin Nuclei model in panel A, Nuclei were segmented with the Fluorescent Overlapping Nuclei model in panels B and C.
To segment objects using StarDist models in the active image select the AI button from the Segment tool group on the Count/Size ribbon. The AI Deep Learning Prediction panel will open.
Perform the following actions within the AI Deep Learning Prediction panel:
-
Load Model.
-
Click the Load button. The Open Model for Prediction dialog opens.
-
Select StarDist Instance Segmentation from the Architecture drop down to show only StarDist models.
-
Use the example images and descriptions to help you select a StarDist model that's appropriate for your objects of interests and click Open.
-
-
Configure Classes
-
Name the class and set the color and shape of predicted objects.
-
-
Select Targets.
-
Select the channel that contains your objects of interest as the segmentation channel
-
-
Set Model Options.
-
We recommend the default settings for the model options are applied initially. You can refine these options as described below following your initial prediction.
-
- Predict and Count.
-
Select the Show Output check box to automatically open the Deep Learning Output panel while prediction takes place. The Deep Learning Output panel will display information and feedback from the StarDist model during prediction.
-
Select the Apply Filters/Splits check box if you wish to Count objects in the image with ranges and automatic splits applied. This is not recommended for instance segmentation with StarDist models as it can become difficult to determine exactly what was predicted by the model.
-
Click Count. Objects of interest that are found in your image will be displayed as measurement objects.
-
Use the Show/Hide button to toggle the display of objects on the image and to determine if you are happy that the measured objects are accurate.
-
Refining StarDist Prediction
If you fail to find the expected number of objects when making a StarDist prediction, there are several adjustments that can be made to improve the prediction.
Object Diameter
The mean diameter of the objects against which a StarDist model was trained is set as the default Object Diameter. If the diameter of your objects of interest differ from this value they will not be predicted accurately.
You can correct this by deselecting the Default check box, and entering the diameter of your objects of interest in the Object Diameter field. If your image is calibrated, the diameter is shown in calibrated units, the diameter is shown in pixels for uncalibrated images.
Select the Size Guide Display Visible check box to display a graphical representation of Object Diameter on the active image.
You can change the Object Diameter setting by clicking on the size guide and dragging the control points. You can also use the control points to move the guide around the active image, or to the side of the active image.
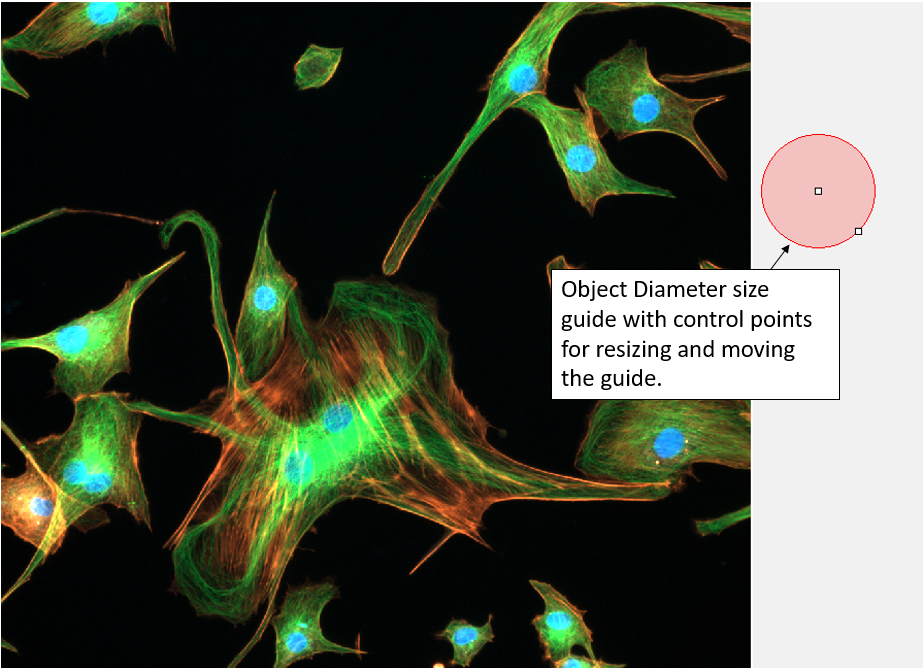
Figure illustrating the StarDist Object Diameter size guide.
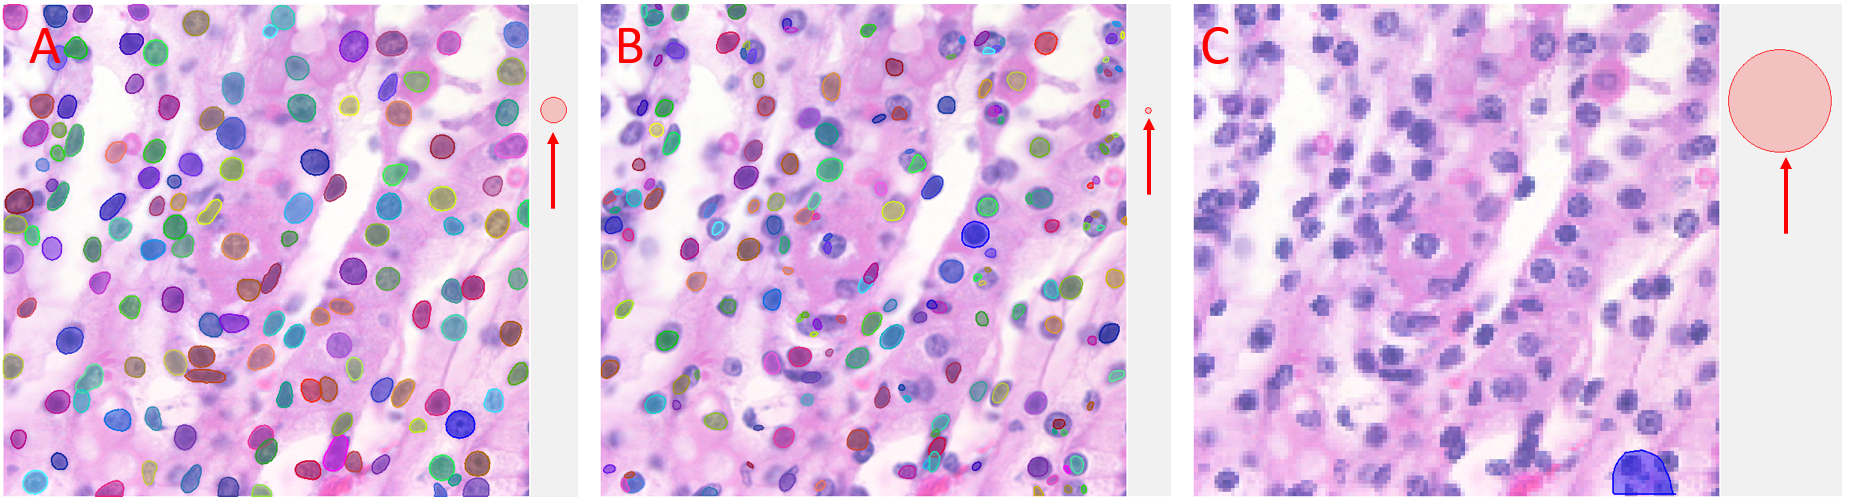
Figure illustrating the effect of Object Diameter on StarDist Prediction. A) Accurate Prediction of objects when the object diameter matches the default size of the model (size guide arrowed). B) Inaccurate prediction made when the default object diameter is smaller than the objects of interest (size guide arrowed). Increase the Object Diameter to improve prediction. C) Inaccurate prediction made when the default object size is larger than the objects of interest (size guide arrowed). Decrease the object diameter to improve accuracy.
Threshold (%)
Decreasing the Threshold(%) setting increases the number of predicted objects (and also increases the probability of generating false positives), increasing the Threshold(%) setting decreases the number of predicted objects (and reduces the probability of generating false positives).
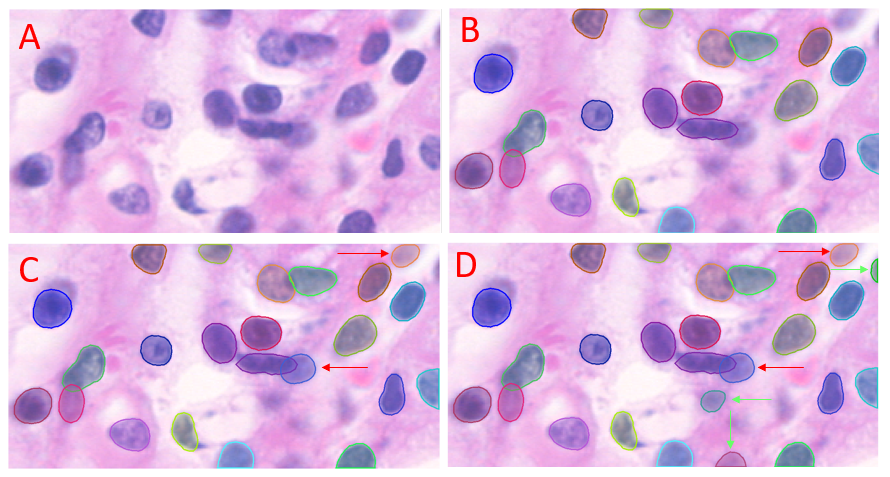
Figure illustrating the affect of the Threshold% setting on StarDist prediction. A) Unlabeled. B) StarDist prediction with Threshold% set to 69.2 (default). C) StarDist prediction with Threshold% reduced to 50. Two additional objects (relative to B) are predicted (red arrows). D) StarDist prediction with Threshold% reduced to 20. Three additional objects (relative to C) are predicted (green arrows).
Max Overlap (%)
If your objects of interest overlap or intersect, you can adjust the degree of permitted overlap between valid objects with the Max Overlap(%) setting. Increase this value to allow an increasing degree of overlap, reduce it to allow a decreasing degree of overlap.
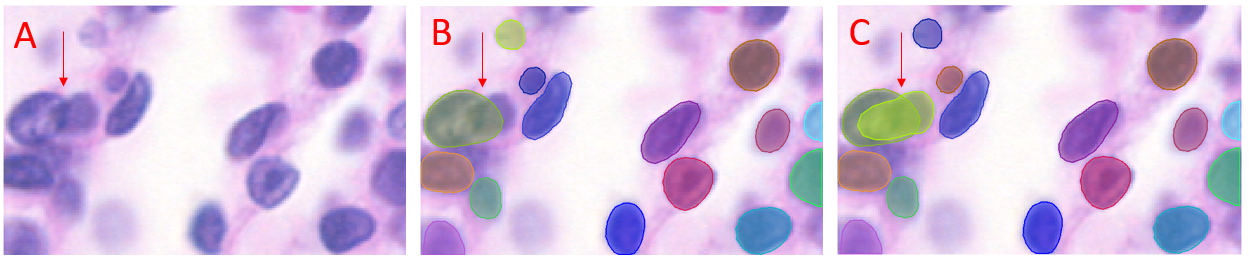
Figure illustrating the effect of the Max Overlap(%) setting on StarDist prediction. A) Unlabeled. A pair of overlapping objects are arrowed. B) StarDist prediction with Max Overlap(%) set to 30 (default). Only one of the overlapping objects is predicted (arrow). C) StarDist prediction with Max Overlap(%) set to 72. Both of the overlapping objects are predicted with this setting (arrow).
Allow Overlap
With this setting enabled overlapping objects are drawn in full, with some pixels included in more than one object. With the setting disabled overlapping objects are truncated, pixels can only be included in a single object.
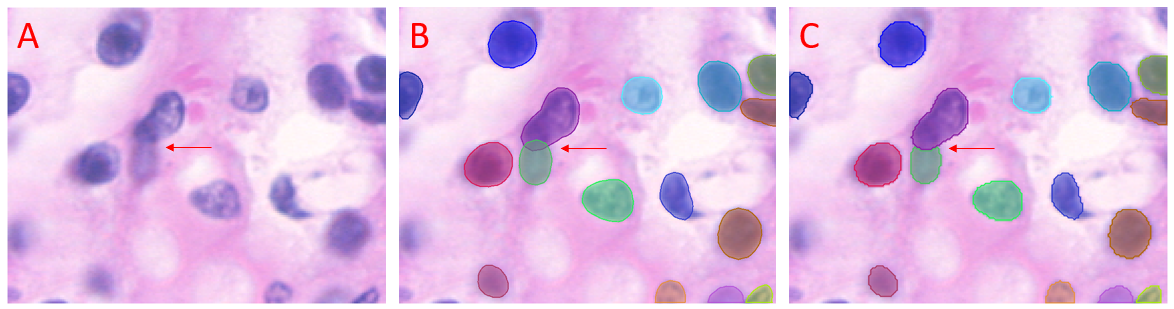
Figure illustrating the effect of the Allow Overlap setting. A) Unlabeled field with overlapping objects arrowed. B) StarDist prediction with Allow Overlap enabled. The overlapping objects (arrowed) are drawn in full, with some pixels included in both overlapping objects. C) StarDist prediction with Allow Overlap disabled. One of the overlapping objects (arrowed) is drawn in full, with the second truncated.
If you are unable to predict your objects of interest having exhausted all of the refinement steps, you can refine your model with further training.
Click Continue Training to open the model in the AI Deep Learning Training Panel.
Locked models can not be further trained. Click Clone Model to open the Clone Model dialog. The cloned model can be opened in the trainer and improved with additional training while keeping the current model unchanged.
Saving Deep Learning Segmentation Settings
It's convenient to save all of your deep learning settings including your model, model options, range settings, and split settings as a single settings file. To do this, click Save in the Measurements tool group on the Count/Size ribbon. A Save Measurements Options dialog opens. Name and save your measurements options (.iqo) file.
Restoring Saved Deep Learning Segmentation Settings
Click Load in the Measurements tool group on the Count/Size ribbon. A Load Measurements Options dialog opens. Navigate to your saved measurements options (.iqo) file and click Open. Your saved settings are restored.
Bibliography
Schmidt, U., Weigert, M., Broaddus, C., Myers, G. (2018). Cell Detection with Star-Convex Polygons. In: Frangi, A., Schnabel, J., Davatzikos, C., Alberola-López, C., Fichtinger, G. (eds) Medical Image Computing and Computer Assisted Intervention – MICCAI 2018. MICCAI 2018. Lecture Notes in Computer Science(), vol 11071. Springer, Cham. https://doi.org/10.1007/978-3-030-00934-2_30
Learn more about all features in Count/Size